Add or Remove Form Fields Dynamically
With the help of FormArray we will implement one use case to understand that how we can add or remove form fields dynamically in Angular.
What is FormArray?
A FormArray is an alternative to FormGroup, which is used to manage the form controls like FormGroup , FormControl and another FormArray. When we are having the use case where we are not aware that how many controls will be there. That should be managed dynamically , at that time we need to use the FormArray. To use the FormArray we need to import the ReactiveFormsModule from ‘@angular/forms’ package.
Use Case
We will implement one inline editable table to manage the user. Here we can add the new user and also remove the user dynamically. We need to add some basic details of user like Username , Mobile No. , Email Id and Address. And on the last column of table there will be Add or Remove button to add or remove the users to and from the table. So let’s start with the implementation.
Firstly will create one component named as manage-user using below command.
ng g c manage-user
After creating the component we need to import this component inside app.module.ts file inside declaration array.
import { NgModule } from '@angular/core';
import { ReactiveFormsModule } from '@angular/forms';
import { BrowserModule } from '@angular/platform-browser';
import { AppRoutingModule } from './app-routing.module';
import { AppComponent } from './app.component';
import { ManageUserComponent } from './manage-user/manage-user.component';
@NgModule({
  declarations: [
  AppComponent,
  ManageUserComponent
],
imports: [
  BrowserModule,
  AppRoutingModule,
  ReactiveFormsModule
],
providers: [],
  bootstrap: [AppComponent
],
})
export class AppModule { }
import { Component, OnInit } from '@angular/core';
import { FormArray, FormBuilder, FormGroup } from '@angular/forms';
@Component({
  selector:'app-manage-user',
  templateUrl:'./manage-user.component.html',
  styleUrls: ['./manage-user.component.scss']
})
export class ManageUserComponent implements OnInit {
 userForm!: FormGroup;
 userData!: FormArray;
 controls!: FormArray;
 constructor(private formBuilder: FormBuilder) { }
 ngOnInit() {
   this.userForm = new FormGroup({
     userData:new FormArray([])
   });
   this.addUser();
}
ngAfterOnInit() {
  this.controls = this.userForm.get('tableRows') as FormArray;
}
createUser(): FormGroup {
  return this.formBuilder.group({
    Username: [''],
    MobileNo: [''],
    EmailId: [''],
    Address: ['']
  });
}
addUser(): void {
   this.userData = this.userForm.get('userData') as FormArray;
   this.userData.push(this.createUser());
}
deleteUser(index: number) {
  const control = this.userForm.get('userData') as FormArray;
  control.removeAt(index);
}
get getFormControls() {
  const control = this.userForm.get('userData') as FormArray;
  return control;
}
}
<div class="container-fluid">
   <div [formGroup]="userForm">
     <table class="table">
       <thead class="thead-dark">
         <tr>
           <th scope="col">Username</th>
           <th scope="col">Mobile Number</th>
           <th scope="col">Email Id</th>
           <th scope="col">Address</th>
         </tr>
      </thead>
      <tbody>
        <ng-container formArrayName="userData" *ngFor="let group of getFormControls.controls ; let i=index">
           <tr [formGroupName]="i">
              <td><input formControlName="Username" placeholder="Username"></td>
              <td><input formControlName="MobileNo" placeholder="Mobile No"></td>
              <td><input formControlName="EmailId" placeholder="Email Id"></td>
              <td><input formControlName="Address" placeholder="Address"></td>
              <td>
                <button class="btn btn-success mx-3"(click)="addUser()" *ngIf="getFormControls.controls.length == i+1">Add</button>
                <button class="btn btn-danger"(click)="deleteUser(i)"*ngIf="getFormControls.controls.length !== i+1">Remove</button>
              </td>
          </tr>
       </ng-container>
    </tbody>
   </table>
 </div>
</div>

User Details:
{{this.userForm.value | json}}
Add User
On click of add button new row will be added at the end of the table. It adds new FormGroup To FormArray.
addUser(): void {
 this.userData = this.userForm.get('userData') as FormArray;
  this.userData.push(this.createUser());
}
Remove User
On the click of the remove button, the user will able to delete/remove particular user data from the table. It removes particular FormGroup To FormArray.
deleteUser(index: number) {
  const control = this.userForm.get('userData') as FormArray;
  control.removeAt(index);
}
Initiate the Form
createUser(): FormGroup {
  return this.formBuilder.group({
    Username: [''],
    MobileNo: [''],
    EmailId: [''],
    Address: ['']
  });
}
Get The Controls
get getFormControls() {
   const control = this.userForm.get('userData') as FormArray;
   return control;
}
At last we have displayed the form controls data in html using {{this.userForm.value | json}}.
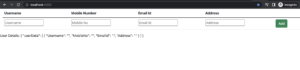
When we will run this application , below will be the output.
Initially output looks like
You can add another rows by clicking on Add row –
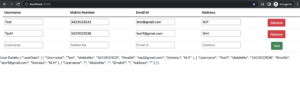
Here you can see Remove button. On click of that you can delete the particular record. Also User details is displaying in json format below to better understand the result. So that is how we can add or remove form fields dynamically in angular.
If you want to get basic knowledge about form then click here.