What is Custom Directive?
Similar to the in-built directives, custom directive is also used to extend the functionality of HTML. Only difference is that custom directive is implemented manually by the developer and in-built directives are already implemented by angular. We have learnt about Directives and its type in previous article. Let’s recap these quickly, so that it will be easy to understand the custom directives.
Types Of Directives
- Attribute Directive – It manipulate the DOM by changing its behavior and appearance.
- Structural Directive – These are responsible for changing the structure of the DOM.
- Component Directive – Component directive is used to specify the HTML templates.
As we already discussed these types in previous article , we are not going to dig it in detail. So will directly create the custom directive now.
Creating a custom Attribute Directive
Suppose we want to change the color of any text. Then let’s try to achieve it by using custom directive.
First of all we can create the custom directive by using below command.
ng g d directive_name
or
ng generate directive directive_name
Let’s create our custom attribute directive with below name
ng generate directive custom-color
So it will create custom-color.directive.ts file for us. Also its dependency will be added in app.module.ts inside declaration section. Initially if you will see this file , below code will be added there automatically after creating it.
Filename : custom-color.directive.ts

import { Directive } from '@angular/core';
@Directive({
   selector:'[appCustomColor]'
})
export class CustomColorDirective {
   constructor() { }
}
Directive is very much similar to the components. Only difference is that inside component we used @Component decorator. But inside directive that is replaced by @Directive decorator. And Directive is imported from the @angular/core package. Inside directive decorator there is selector name. Thats we will bind in html. And our class name is CustomColorDirective. So whatever the logic we need to implement for changing the text color , that should be inside that class.
So let’s add the logic to change the color of text.
Filename : custom-color.directive.ts

import { Directive, ElementRef, OnInit } from '@angular/core';
@Directive({
   selector:'[appCustomColor]'
})
export class CustomColorDirective implements OnInit{
   constructor(private elementRef: ElementRef) {
   }
   ngOnInit() {
      this.elementRef.nativeElement.style.color = "green";
   }
}
So in the above code we have added logic to change the color of text. For that we have simply imported the ElementRef and inject its dependency in constructor. ElementRef is mainly used to access the DOM element. And inside ngOnInit() we have just set the color property as green using the elementRef.
Now we need to apply this directive inside our HTML text. So we need to simply add our directive’s selector name where we want to change the color of text.
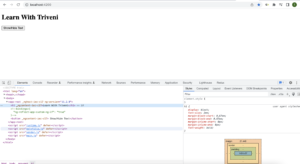
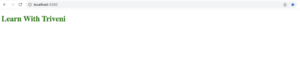
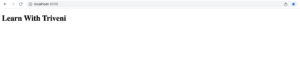
Filename : app.component.html

<h1 appCustomColor>Learn With Triveni</h1>
Now our app is ready to run. So we will see the below output on browser.
If you will remove the selector name from h1 tag then your output will be.
Filename : app.component.html

<h1>Learn With Triveni</h1>
So this is how custom attribute directive works.
Creating a custom Structural Directive
In structural directive we will try to create our own ngIf custom directive. So our usecase is we want to create one text and one button. And on button click that text should be show and hide. So lets create custom directive by below command.
ng generate directive custom-ng-if
So it will create below code for us inside custom-ng-if.directive.ts. Also its dependency will be added in app.module.ts inside declaration section.
Filename : custom-ng-if.directive.ts

import {Directive } from '@angular/core';
@Directive({
    selector:'[appCustomNgIf]'
})
export class CustomNgIfDirective {
  constructor() { }
}
Filename : custom-ng-if.directive.ts

import {Directive, Input, TemplateRef, ViewContainerRef } from '@angular/core';
@Directive({
  selector:'[appCustomNgIf]'
})
export class CustomNgIfDirective {
  @Input() set appCustomNgIf(isVisible: boolean) {
    if(isVisible){
        this.viewContainerRef.createEmbeddedView(this.templateRef);
    } else {
        this.viewContainerRef.clear();
    }
  }

  constructor(private templateRef: TemplateRef<any>,
              private viewContainerRef: ViewContainerRef) {
  }
}
Filename : app.component.html

<h1 *appCustomNgIf=isVisible>Learn With Triveni</h1>
<button (click)="isVisible = !isVisible"> Show/Hide Text</button>
Filename : app.component.ts

import { Component } from '@angular/core';
@Component({
  selector:'app-root',
  templateUrl:'./app.component.html',
  styleUrls: ['./app.component.scss']
  })
export class AppComponent {
   isVisible: boolean = true;
}