What is Angular components?
Angular components are main building block of angular application. In simple words we can say that Components are basically classes that interact with the .html file of the component, which gets displayed on the browser. Each component consist of –
1. An HTML template which indicates that what needs to render on the view page.
2. A typescript class which defined behavior
3. A CSS selector by which identify that how the component can be used in template.
4. Optionally, CSS styles applied to the template
In this chapter we will see how to create the components in angular. So it is very easiest way to create the component through angular CLI commands or we can create the components manually as well. Firstly we will see how to create the component using angular CLI.
Creating a component through Angular CLI
You need to navigate to your project directory where you want to create your component. Then run the below command –
![]()
Or in short you can run this command also –
![]()
Once you will run this command it will give the below result –
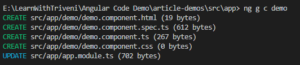
Here you can see the 4 new files has been created and its corresponding dependency is updated in module file.
- <component-name>.component.html – Its a template file where we can write our html code.
- <component-name>.component.spec.ts- Its a testing file where we can write our unit test cases.
- <component-name>.component.ts- Its a component file where we can write our main logic.
- <component-name>.component.css- Its a css file which is used for styling.
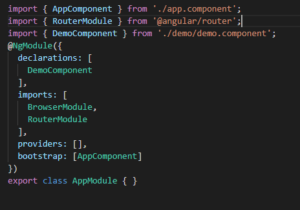
- In module.ts file component dependency is declared whenever we create any component. You can see it inside the declaration like below –
So whenever you will create any component <component-name>.component.ts file created with some default code.
Let see below –
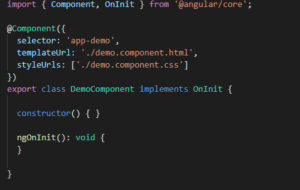
Here you can see in first line import statement is there , which is basically used for importing the dependencies. here Component and OnInit(Angular Life Cycle Hook) is imported. After import there is a @component decorator with some metadata. It tells that class DemoComponent is treated as a component. so component decorator is consist of selector name which is used to use the component in templates. Then in templateUrl we give our html file reference and in styleUrls we give our css file reference. Then class name is there which implements the OnInit Life Cycle hook. Then constructor and ngOnInit() method is used. So in this way component file looks like.
So this is the way to create the component using CLI command. We can create the component manually as well. Lets have a look into this as well.
Creating a component manually
To create the component manually you need to navigate to your project directory.
1. You need to create the <component-name>.component.ts file.
2. Create the <component-name>.component.html file.
3. Create the <component-name>.component.css file.
4. If you want to write the unit test case the only create the <component-name>.component.specs file.
Then add the code mentioned in above diagram in component file(<component-name>.component.ts ).
Just make sure you are giving the correct reference for html and css file.
So all the things are similar in manually component creation as well only you need to create the file by your own thats it.
Conclusion: This is short detail about the angular component that how to crate the angular components and how many files are created when we create the angular component and what is the purpose of each. You will find the more details about the components in upcoming tutorials. Meanwhile in this tutorial we have talked about the one life cycle hook(ngOnInit). So you can get more details about that here(Angular Life Cycle Hooks). How to communicate between the components. For this you can refer this link(Communication between angular components).